Unicorn cake is a delightful and whimsical addition to any celebration, capturing the magic and wonder that make special occasions memorable. This guide will take you through the steps to create a stunning unicorn cake, complete with colorful frosting and enchanting decorations.
Why You Will Love a Unicorn Cake :
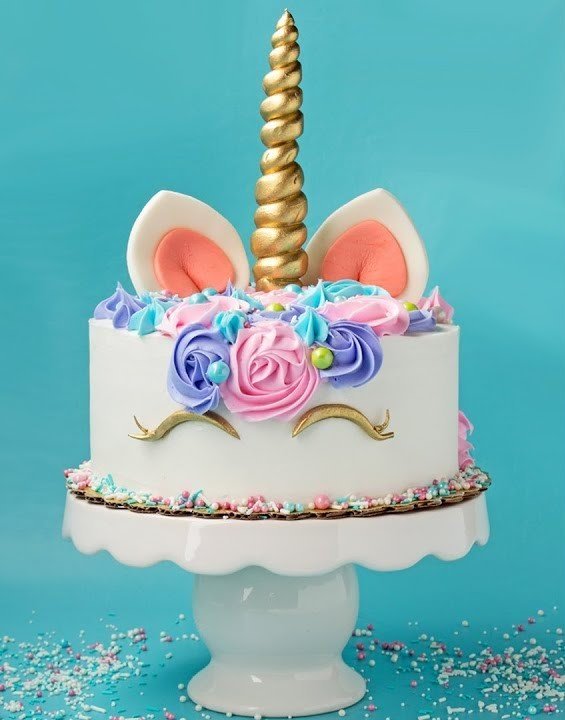
Eye-Catching Design: The vibrant colors, intricate decorations, and mythical unicorn elements make these cakes a stunning centerpiece for any party.
Occasion Flexibility: Unicorn cakes are suitable for a wide range of events, from birthdays and baby showers to weddings and themed parties.
Fun to Make: Creating a unicorn cake allows you to unleash your creativity. Whether you’re a professional baker or a home enthusiast, designing and decorating a unicorn cake can be a fun and fulfilling experience.
Brings Happiness: The magical and fantastical elements of a unicorn cake can bring joy and excitement, especially to children. Seeing their favorite mythical creature in cake form can make their day extra special.
Themed Decor: A unicorn cake can serve as inspiration for the entire party theme, influencing decorations, party favors, and other treats, creating a cohesive and magical atmosphere.
Flavor Variety: Unicorn cakes are not just about looks; they can be as delicious as they are beautiful. With layers of moist cake, rich fillings, and smooth frosting, they offer a delightful taste experience.
Ingredients and Tools You Will Need :
Ingredients:
- 2 or 3 layers of your favorite cake (vanilla, chocolate, etc.)
- Buttercream or fondant for frosting
- Gel food coloring (various colors)
- Edible gold paint or gold luster dust
- Black food coloring or edible black gel for the eyes
- Sprinkles or edible pearls for decoration
Tools:
- Cake turntable (optional, but helpful)
- Offset spatula
- Piping bags with different tips (star, round, etc.)
- Fondant smoother
- Paintbrush (for edible paint)
- Cake board or serving plate
Step-by-Step Instructions :
1. Bake and Cool the Cake Layers:
- Begin by baking your cake layers according to your chosen recipe. Ensure the cakes are completely cooled before proceeding to the next step.
2. Level the Cake Layers:
- Use a serrated knife to level the top of each cake layer if they have domed during baking. Place the knife parallel to the cake and slice off the rounded top to create a flat surface. Repeat for all layers.
3. Prepare the Cake Board:
- Place a small dollop of frosting in the center of your cake board or serving plate to secure the bottom layer of the cake and prevent it from sliding.
4. Add the First Cake Layer:
- Place the first cake layer on the cake board, ensuring it is centered.
5. Apply the Frosting:
- Using an offset spatula, spread a generous amount of frosting evenly over the top of the first layer. Start from the center and work your way out to the edges. Repeat with the remaining layers.
6. Crumb Coat the Cake:
- Apply a thin layer of frosting over the entire cake. This is called a crumb coat and helps to seal in any loose crumbs. Once the crumb coat is applied, refrigerate the cake for about 15-30 minutes to set.
7. Apply the Final Coat of Frosting:
- Apply a thicker, smooth layer of frosting over the crumb coat, using a fondant smoother or offset spatula to achieve a clean finish. You can use white frosting or a pastel color for a magical look.
8. Create the Unicorn Decorations:
- Unicorn Horn and Ears:
- Roll out fondant and shape it into a horn and ears. Use a paintbrush to apply edible gold paint or gold luster dust to the horn and the inner part of the ears. Allow them to dry and set.
- Eyes:
- Use black food coloring or edible gel to draw the unicorn’s eyes on the front of the cake. You can use a fine-tipped brush or a piping bag with a small round tip.
9. Pipe the Mane:
- Divide your remaining frosting into several bowls and color each one with gel food coloring to create a variety of pastel shades.
- Fill piping bags fitted with star tips with the colored frostings. Pipe rosettes, swirls, and other designs on the top and sides of the cake to create the unicorn’s mane. Add sprinkles or edible pearls for extra sparkle.
10. Assemble the Unicorn:
- Insert the horn into the top center of the cake.
- Place the ears on either side of the horn.
- Add any additional decorative touches, such as more sprinkles or edible glitter, to enhance the magical look.
Final Touches:
- Step back and admire your stunning unicorn cake! Make any final adjustments to the decorations as needed.
- Store the cake in the refrigerator until ready to serve. Allow it to come to room temperature before serving for the best taste and texture.